


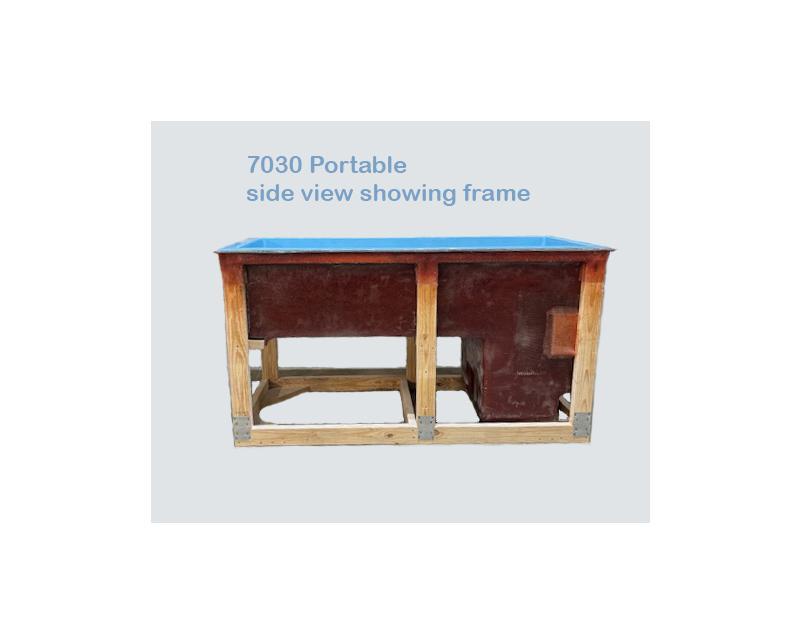


Portable Baptistry with Frame -Small 70" Length
Overview
- Available in blue, white or bone (custom colors available)
- Even with its smaller size it accomodates taller adults (When laying down there is about 5'3" between the two ends which leaves up to 5ft from knees to head. Most 6ft people need about 4ft 8" from knees to top of head, so you can generally accomodate someone up to 6ft 4" tall (give or take) depending on their proportions.
- 1 piece, light weight, self supporting structure with wood framing
- Use as is or with our skirting or your own furniture grade ply-wood panels
- Can be used with a 120 or 240v Immersion Heater or circulation heater
- Empty Weight is Aprox 170 lbs.
- 18" depth from seat platform to top
- OPTIONAL: Exterior steps (27" tall x 24.5" wide x 30" long) aproximate.
- OPTIONAL: Fiberglass Top adds about 1/2" to height
- How to move your portable baptistry We sell wheel kits, but for the money and for safety, we suggest using two wooden furniture dollies (available at Harbor Freight for under $20). Be sure to remove the baptistry from the dollies and place it on the ground before filling or using.

- The portable baptistry is an excellent choice for churches who need a portable baptistry and want to customize the exterior of the unit. With the wooden frame work, you can easily add cabinet grade panels or other materials to the sides for a custom look or to match your existing sanctuary decor.
- The purchase of our fiberglass top allows for the portable baptistry to be used as a communion table or even as a literature table in the vestibule or narthex. We sell a cloth table cover to match the skirting that allows for complete covering of your portable baptistry.
- Fill and drain your portable baptistry with a garden hose and sump pump. Or, if you prefer, we sell a portable circulation heater that includes a pump and hoses for easy filling, draining and heating o f the portable baptistery.
- To move the baptistry, we recommend simple furniture movers, available at home improvement stores. We like the kind that are made of wood, covered with carpet and feature 4 casters. Two of these movers are all it takes to transport this baptistry. (Be sure to remove the movers before attempting to fill or use the baptistry)
Portable Baptistry Drain Locations
- Note the drawing below is not of this exact unit but drain locations are similar.

Leaving water in the tub We don't recommend leaving water in a fiberglass baptistry more than a few days, but if you do plan on leaving water in the tub, be sure to upgrade to the PREMIUM GEL COAT finish. I
Here are the basic for operating the portable baptistry with optional heater
- After you unpack it we suggest doing a test run outside.
- Wipe out the inside of the tub from any dust, dirt or debris.
- Fill with water to make sure the suction and return fittings are covered by at least an inch or two of water.
- Check for leaks at fittings
- Plug the heater cord into the 120v power outlet.
- Test the GFCI button on the cord before each use
- Turn the heater temp knob to off
- Use the Air button on cabinet to turn the pump on
- Let pump run for a few minutes to ensure proper operation
- There is a thermostat on the face of the heater that can be adjusted
- Once water flow is established…Turn thermostat to mid point…light on heater should come on. Do not expect to feel hot water, it will take time to warm up. Adjust thermostat to desired temperature.
- Before baptsing be sure to unplug the power cord.
- Before draining unit be sure to unplug heater from power
- Remove any residual water from tub with a towel or sponge and wipe down interior
- Refer to the Heater manual for warnings and more instructions, operational considerations, etc.
HEATER SPECS
Heater is made from UL listed components but is not UL listed. Some localities (WA state, Los Angeles, NYC, etc.) will not issue a building electrical permit for any baptistry heater not UL listed. Check your locality before ordering.
The heater is a 120volt plug in heater with a GFCI protected cord. To operate first fill the tub with water up to about the top stair tread or maybe an inch or so higher depending on the people being baptised. Plug heater in to wall outlet and if needed, push the reset button on the wall GFCI so the green light is on. Use air button switch to turn the heater ON. The pump should start and begin circulating water (verify circulation visually and or with hand) Once heater is circulating water it will build pressure in the heating cylinder and the amber light on front of heater should light. If the light does not come on, turn the temperature dial all the way up (Clockwise). If light still does not come on, and pump is running then verify water level is above the stair tread. (Sometimes adding another 1/2" or so of water will turn heater light on.) If heater light is not on then unplug heater from wall and adjust the pressure switch. With heater unplugged, remove 2 screws on top from of heater faceplate then locate the pressure switch and turn the knurled dial CCW about 15 clicks. Plug heater in and test. If light does not come on, repeat sequence until light comes on.
Products You May Like


Full Size Portable Baptistry 9.5 Ft Wide
Product ID: ASB-947SA

Portable Baptistry Cabinet with Removable Heater
Product ID: FUN-PBPKG

Full Size Portable Baptistry 9.5 Ft Wide
Product ID: ASB-947SA-113259

Portable Baptistry with Frame X-Long 7ft3in
Product ID: FUN-6KFR-XL

Portable Baptistry Box with Steps 5ft 8in Long
Product ID: FS-EZP

Portable Baptistry with Heater DELUXE PACKAGE 6ft4in
Product ID: FUN-6PKG